Monday, November 24, 2014

Author cybErtron lEgacy | 0 comments

Forgot your Wi-Fi Password???????? Here's How to Recover.....!!!

People keep forgetting their passwords all the time, but if there's one kind of password that no one bothers to remember it has to be the Wi-Fi password.Before you head down that path, here are a few tips to recover your saved Wi-Fi passwords.That is illegal and could land you into far more serious trouble than you probably realise. These steps are only for recovering your own Wi-Fi password, and are impossible if you haven't already got access to the network on one of your devices. If you have forgotten the password of your Wi-Fi network, follow these steps to recover it.


Windows
While you might come across several apps that claim to let you recover saved Wi-Fi passwords, you don't need any of those on Windows PCs. Even if you don't have administrator access on your PC, you can look up the Wi-Fi password by following these steps. Note that this method only works when the security is set to Personal - if you're connected to an Enterprise network, such as your office Wi-Fi, then this method will not show the password.
1. Using a PC that is connected to the Wi-Fi network in question, go to Start > Control Panel > Network and Sharing Centre. On Windows 8 computers, you can tapWindows key + C, click Search and look for Network and Sharing Center.
2. Click Change adapter settings on the left sidebar.
3. Right-click the Wi-Fi network you're using and click on Status.
4. Click Wireless properties.
5. Click the Security tab.

6. Now you will see the name of the Wi-Fi network and the hidden password. CheckShow characters to reveal the saved password.
Mac
You can find saved Wi-Fi passwords through the Keychain Access app on the Mac. Here's how.
1. Go to /Applications/Utilities.
2. Open Keychain Access. Go to the System keychain listed under the Keychains on the top left.
3. Search for the Wi-Fi network you are trying to find the password for, by typing the name of the network (SSID) in the search box in the top right corner, or by manually finding it in the list.
4. Double-click the name of the network and in the resultant box, check the Show password option.
4. Enter the user account password when prompted and you'll be shown the saved Wi-Fi password in clear-text.
Via the router
In case you don't have a Windows or Mac computer that has the Wi-Fi credentials saved, or if you're trying to do this with your phone or tablet, you can still try to find the saved Wi-Fi password through the router. Obviously this will only work if you're connected to the router's network - remember you can connect to the router with an Ethernet cable as well. Tablets and mobile phones can't proceed further unless they are already connected to the Wi-Fi network.
The steps will vary slightly with each router. Changing the wrong settings here may mess up the wireless network for everyone, so proceed at your own risk.
1. First, open your browser and go to the router's local address - this is usually http://192.168.1.1 - but the URL varies depending on the make of the router, so check the manual (or the official website) to find the correct address.
2. Enter the username and password. Again, this will vary by manufacturer, and you can and should change the passwords as well. By default though, on both MTNL and Airtel provided routers, both the username and password are "admin" without the quotes (other routers often have "password" without quotes as the default password) . You'll have to check with the router manufacturer or ISP if this combinations don't work.
3. Click Internet and then click Wireless. In some routers the Wireless option may be visible on the main screen.In this section you'll see the security type (WEP, WPA, etc.) and the key. Some routers may have these options under a Security tab.
The box next to the key field contains the password for the Wi-Fi network. On many routers this is in plain text, so you can just note it down.
If all these fail..
You might have to reset the router if nothing else works. Don't do this unless you just can't connect to the network using any device. Resetting the router is an extreme step and you will have to reconfigure the network to restore your Internet connection. Unless you know how to do that, we suggest that you contact your ISP for help in this process.
We cant give you  the step-by-step guide for this because it varies quite a bit depending on the make of the router. You must check the user manual for your router before attempting this. Each router has a reset switch. Some routers have a tiny button, while other routers have this button hidden in a tiny hole (that you can hit using a paper clip). This switch needs to be pressed for a few seconds for the router to reset. Flashing lights on the router will tell you that it has been reset. Once that is done, wait for it to reboot and reconfigure the network. The exact steps for this process will also vary depending on your ISP, which is why we recommend contacting your ISP if you need to reset your wireless router, unless you know exactly what you are doing.
Read more...

Saturday, October 20, 2012

Author Unknown | 0 comments

Don't get tracked while browsing............(Thanks to Google..)


Google has added a Do Not Track privacy option to Chrome's developer channel, though it's late to the party compared to other browsers.
When Do Not Track is enabled in a browser, it signals to Websites and to advertisers that the user doesn't want to be followed around the Web for ad targeting purposes. Ad networks and sites aren't required to comply, butseveral of them do, and the U.S. government is now pressuring more companies to play along, including Google.
Hence Do Not Track in Google Chrome. Google spokesman Rob Shilkin specifically called out the company's pact with the White House as its reason for adding the feature in the Chromium developer channel in a statement to All Things Digital. Do Not Track should be available in the stable version of Chrome by the end of the year, he said.

Google will be the last of the major browser makers to add a Do Not Track option, which is already available in Firefox, Internet Explorer and Safari. Third-party Do not Track browser tools are available as well.
Broad participation may seem like good news, but Do Not Track is still controversial. Because the setting doesn't guarantee privacy across all Websites, it could give users a false sense of security, and the seediest advertisers may never participate.
Do Not Track also treads on thin ice among advertisers who do participate. They're hoping that even if the tool is widely available, most people won't bother to enable it. Microsoft's recent decision to make Do Not Track the default setting for Internet Explorer 10 in Windows 8 jeopardizes that idea. The developers of Apache Web server have already said they'll ignore IE10's Do Not Track settings as a result.

Still, an anti-tracking standard across all browsers seems like a good foundation for improving users' privacy options on the Web. It's good that Google has joined in, even if it was under government pressure.
Read more...
Author Unknown | 0 comments

How to get shortcuts without arrows in Win 7 desktop....


You can remove those arrows by changing a Registry setting, but that's the hard way to do it--and possibly dangerous. You're better off using free software that can tweak the Registry for you.
If you're using Windows XP, download and install Microsoft'sTweakUI (if you haven't, already). This is one of those programs that every XP user should have. Removing the arrows is only one of its useful functions.
Click for full size

If you don't want new shortcuts to be named "Shortcut to…," select Explorer in the left pane. Scroll down the settings list until you find Prefix "Shortcut to" on new shortcuts, and uncheck that option. This setting may require a reboot.Once you have TweakUI up and running, expand theExplorer section in the left pane, then select Shortcut. In the larger, right pane, you'll find four 'Shortcut overlay' options, including None. Select your choice, then click Apply or OK.
Microsoft didn't create a TweakUI for Vista and later versions of Windows. Luckily, Ramesh Kumar did it for them, and made Ultimate Windows Tweaker freely available. It's portable, so you don't have to install it, and it runs fine in Windows 7, 8, and Vista.
Once you're running the program, click Additional Tweaks in the left pane. Check Remove arrows from Shortcut icons, and/or Remove "-Shortcut" suffix for new shortcuts. ClickApply before closing the window.

You'll need to log off and on again to see the results.
Read more...

Wednesday, October 17, 2012

Author Unknown | 0 comments

Master the Ultimate Windows media player..(VLC)


Let's just rip off the Band-Aid and get the bad news out of the way: The standard version of Windows 8 won't include Windows Media Center or the ability to play DVDs by default.
Wait! Put down those pitchforks, home theater PC enthusiasts. Microsoft's ill will toward media support and optical discs is really an opportunity in disguise. Now you have every reason to check out VideoLAN's VLC media player, a versatile app that does much, much more than Windows' baked-in alternative. VLC streams files from the Internet, streams filesto the Internet, manages podcasts, captures webcam videos and, yes, plays DVDs. Blu-rays, too. And that's just the tip of the iceberg.
Simply put, VLC is the power user's media player of choice.
Unfortunately, VLC's deep array of powerful options can also be a bit intimidating at first glance. What do all those buttons and menus actually do? This guide will catch you up to speed on the basics, show you how to watch your favorite movies and Internet streams, and then close with some fun tips and tricks to help you get the most out of this free VLC player.

More than just a DVD player

DVDs aren't the only physical discs that VLC can read: standard audio CDs, VCDs and SVCDs all play without a hitch as well. Experimental Blu-ray disc support was added early in 2012, but the Blu-ray encryption system can make that experimental playback more miss than hit. If VLC refuses to play your favorite HD disc, installing these hush-hush files (at your own risk!) should help for older Blu-rays with AACS encryption, or you could rip the movie to your hard drive using MakeMKV (more on that later) and watch it as you would any video file in VLC, by selecting Media > Open File.
IMAGE COURTESY OF VIDEOLAN
VLC can handle all sorts of media formats and even ignores region coding, so you can watch your favorite foreign films.

Speaking of opening files, OGG and FLAC fans will be happy to hear -- literally -- that VLC supports almost any file type you throw at it, including ISO disc images.
VLC also plays movies and music from the Internet or over your local network via the Media > Open Network Stream command. Media > Open Capture Device displays input from webcams or TV tuner cards so that you can save, stream or just plain view the feed.

Capture screenshots from videos

Like the HTC One X, VLC includes a fun feature that lets you easily take screenshots from a video. Just select Video > Snapshot to save a picture of an individual frame. Screenshots save to your Pictures folder by default, named "VLC-(date and time)". Adjust the options inPreferences > Video > Snapshot if you want VLC to dump screenshots somewhere else.

Stream podcasts and Internet radio

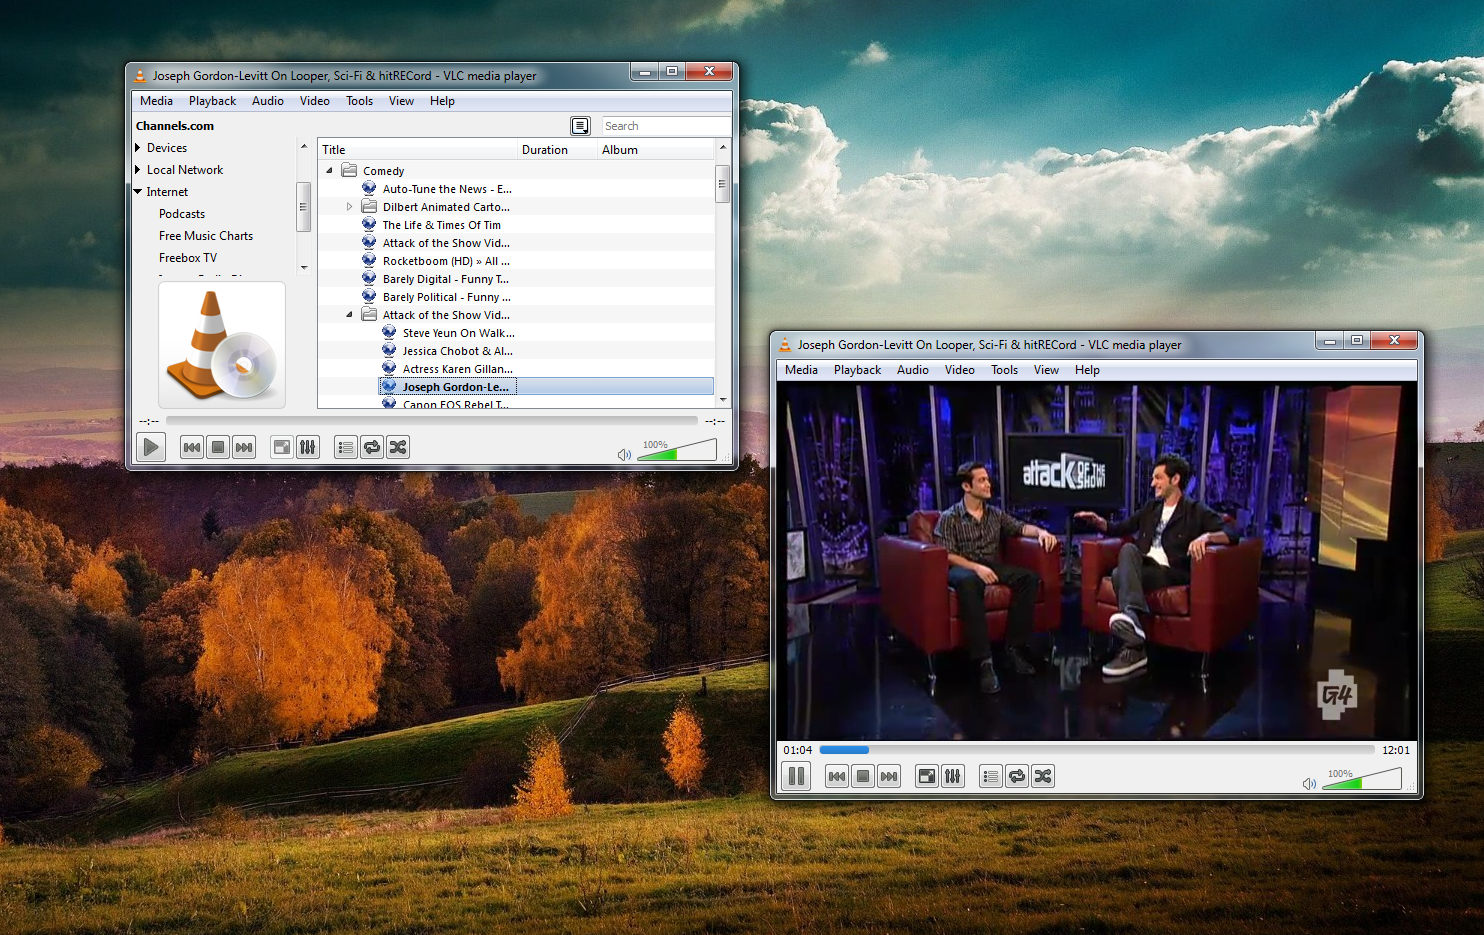
VLC is no one-trick pony: The media player sports several audio options that can help you manage your podcasts or find something new to listen to. Click View > Playlist to bring up the playlist view, then click on the Internet option to reveal a large number of listening options -- including hundreds of Internet radio stations from around the world. The best part? They're all free. If you want to track your favorite podcasts, simply click the gray plusbutton next to the Podcasts option and enter the URL for the RSS feed of the podcast you want to stream.
You can stream tons of free audio and video using the preloaded Internet playlist, or add your own by entering the URL of your favorite podcasts' RSS feeds.

Change how VLC looks with customizable skins

The look of VLC won't impress anybody out of the box; it's as plain vanilla as a piece of free downloadable software can be. Like a mullet, however, that bland demeanor hides a world of awesome possibilities, as VLC lets users change the look of the media player with the help of custom skin files. Simply download an appealing skin from the VLC website, then head into Tools > Preferences > Interface. In the Look and Feel portion, select the Use custom skin option and point VLC toward your saved .vlt skin file. Dozens of different skins are available, some vastly more appealing than others.

Transcoding files with VLC

Not all programs or outside A/V sources handle ASV1 and other esoteric file types as well as VLC. Fortunately, VLC can help you skirt that annoyance; this media player is a basic media converter, too!
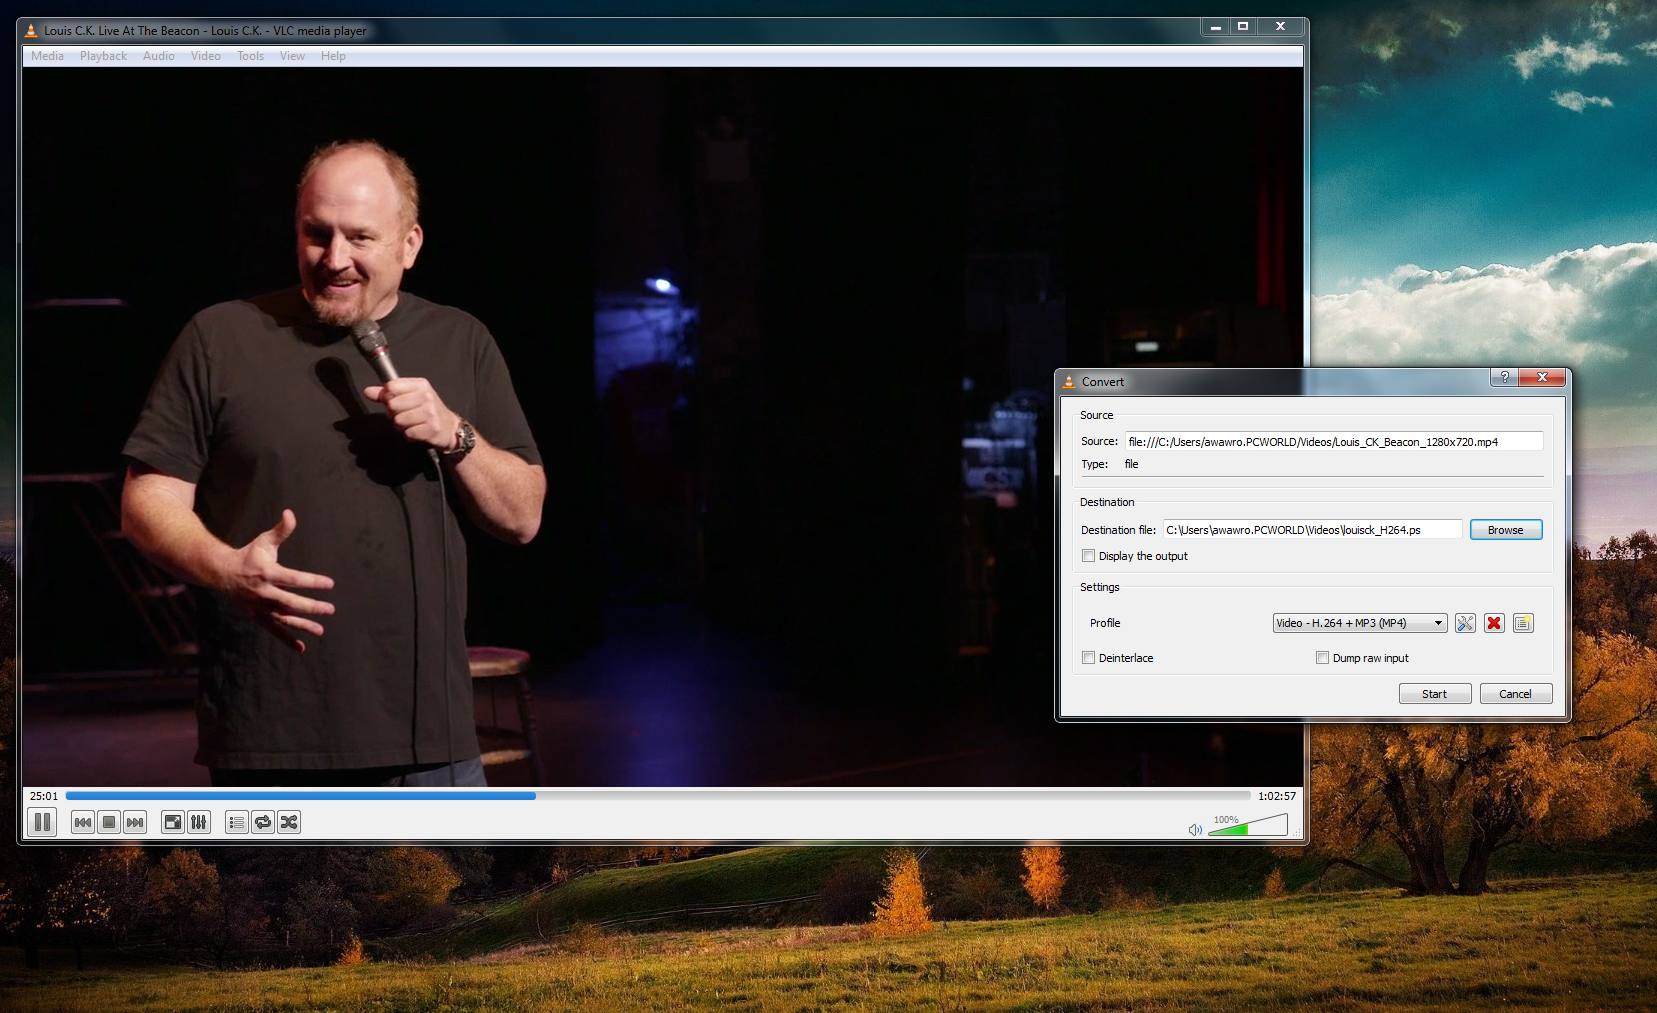
Transcoding existing media files into a different format doesn't take much effort. ClickMedia > Convert/Save, click the Add button, and select an audio or video file to convert. If you have a subtitle file for the film, check the box and select that, as well. Next, pressConvert/Save, then click Browse and choose where you'd like to save the new version of the file. Name the file, being sure to manually give it one of the file extensions listed in the Save as Type field, such as .mpg, .mov, .ogg or .wav. Make sure the extension matches the file type you're converting; an audio extension won't work well if you're converting a video, for instance.
VLC allows you to transcode your media into different formats; you can even convert a video file into an audio file (or vice versa) so you can do neat tricks like turning your favorite comedian's stand-up special into an .mp3 you can listen to at the gym.

You can play around with the audio/video codec details in the drop-down box in the Settings area if you so desire, but unless you have a specific reason to use another file type, I'd suggest sticking to the default MP4 profile for video and MP3 for audio, as they're widely supported formats. The VideoLAN wiki contains useful information about codec types.
Transcoding veterans can fine-tune the audio/video codec combinations even further by clicking the Edit button (represented by an icon of a screwdriver and wrench) to the right of the drop-down box. Once everything looks good, click Start and prepare to wait--transcoding video is an intensive task that can take a long, long time depending on your setup.

The gray area: copying DVDs, Blu-rays and Internet streams with VLC

Note that the Convert/Save options also let you handle streams from network sources and webcams or copy media from physical discs. Saving content you find on YouTube or wherever else on the Internet isn't always legal, so make sure you have the right to do so before you begin. Likewise, make sure you're only making backups of physical discs that you actually own.
The actual process of copying discs is fairly straightforward, however. Open Media >Convert/Save again, but instead of adding files in the File tab, click Disc to select a disc to rip. Afterward, the transcoding options are the same as with a straight file-to-file conversion, and, yes, copying a disc takes a long time. If, on the other hand, you want a straight-up copy of the original files on the disc, just check the Dump Raw Input box.
Copying DVDs and audio discs shouldn't be an issue, but ripping Blu-rays can occasionally be an exercise in frustration. If you run into problems, MakeMKV is a great Blu-ray-ripping resource that can handle modern BD+-encoded Blu-rays and older AACS-encoded Blu-rays alike.
Saving webcam and Internet streams is simple, but the methodology is a little different than with physical media. Open the file using Media > Open (Network Stream or Capture Device), but rather than hitting Play, click the arrow to the right of it and select Stream from the list. Identify the source, press Next, then make sure the destination is set to File, and fiddle with the transcoding options the same way you would when saving a DVD or doing a file-to-file conversion.
One final note: You can capture the video you're watching at any time by simply clicking theRecord button. To add the Record button to the toolbar, click View > Advanced Controls.

Transform your videos into ASCII art

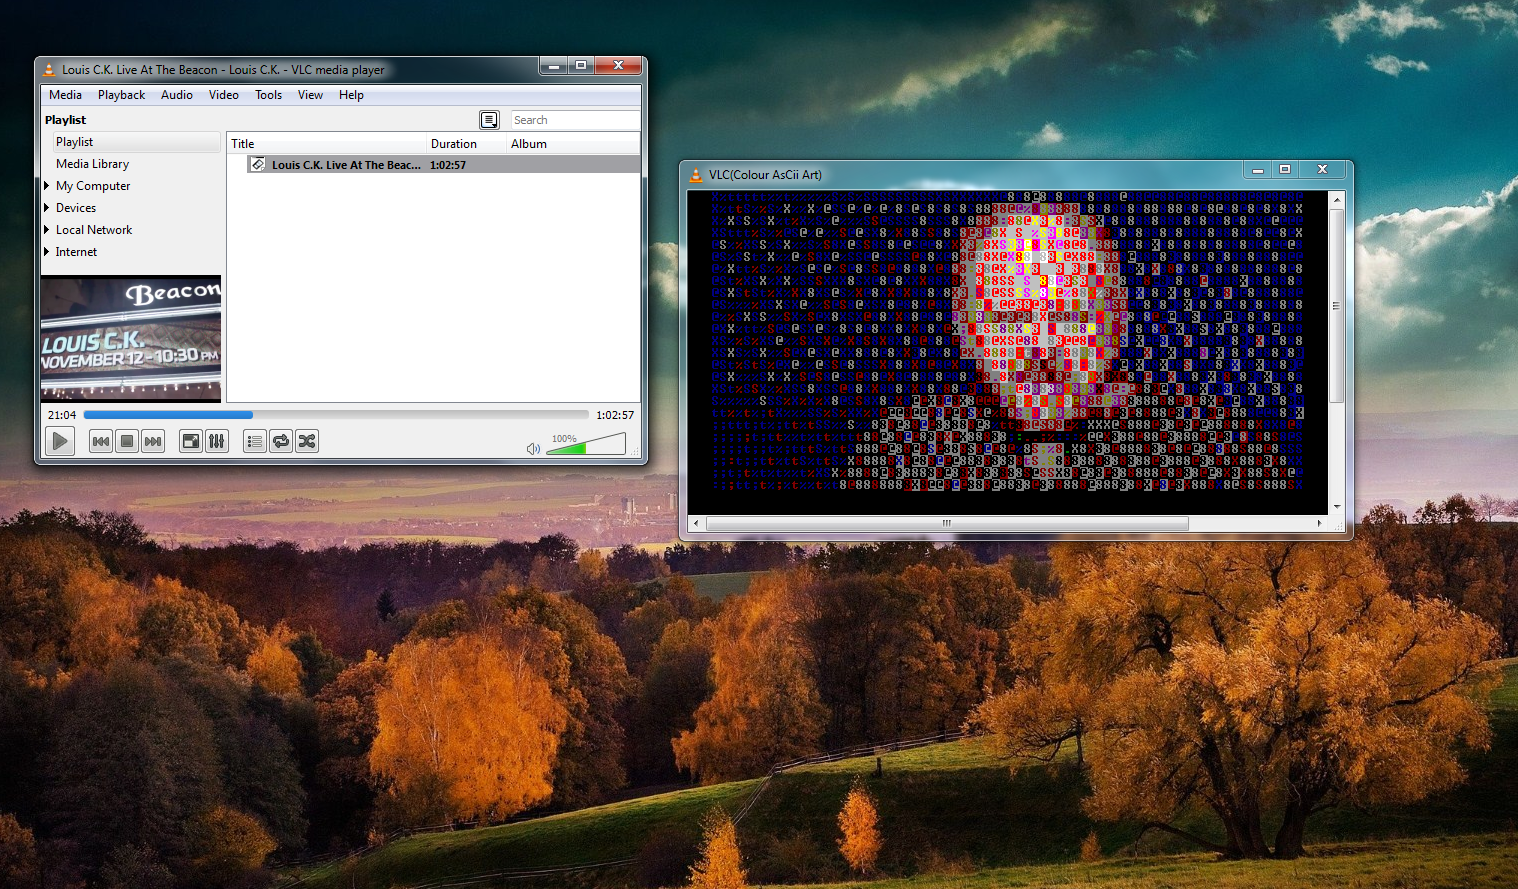
Let's close things out with a bit of fun: VLC can translate video into ASCII art consisting of nothing but numbers and letters. Why? Who knows? It's pointless, but fun.
Louis C.K. performs his Beacon Theater set in ASCII.

To get the alphanumeric party started, select Tools > Preferences > Video. Then, click the drop-down box next to Output (in the Display section) and select Color ASCII Art Video Output. Now, just start a new video and enjoy the text-based show. Be sure to change the output back to Default when you're done!
These tricks only scratch the surface of what VLC can do. Advanced users can set the VLC player to stream video to the Web, batch encode files based on their extension, capture only the audio track from a DVD, access movies from other computers on your network, and more. Check out VideoLAN's incredibly helpful wiki and forums for more tips, tricks, and help with any issues you may run into.
Read more...

Sunday, October 14, 2012

Author Unknown | 0 comments

How to Crack a Wi-Fi Network’s WPA Password with Reaver


How to Crack a Wi-Fi Network's WPA Password with Reaver
Your Wi-Fi network is your conveniently wireless gateway to the internet, and since you're not keen on sharing your connection with any old hooligan who happens to be walking past your home, you secure your network with a password, right? Knowing, as you might, how easy it is to crack a WEP password, you probably secure your network using the more bulletproof WPA security protocol.
Here's the bad news: A new, free, open-source tool called Reaver exploits a security hole in wireless routers and can crack most routers' current passwords with relative ease. Here's how to crack a WPA or WPA2 password, step by step, with Reaver—and how to protect your network against Reaver attacks.
In the first section of this post, I'll walk through the steps required to crack a WPA password using Reaver. You can follow along with either the video or the text below. After that, I'll explain how Reaver works, and what you can do to protect your network against Reaver attacks.
First, a quick note: As we remind often remind readers when we discuss topics that appear potentially malicious: Knowledge is power, but power doesn't mean you should be a jerk, or do anything illegal. Knowing how to pick a lock doesn't make you a thief. Consider this post educational, or a proof-of-concept intellectual exercise. The more you know, the better you can protect yourself.

What You'll Need

You don't have to be a networking wizard to use Reaver, the command-line tool that does the heavy lifting, and if you've got a blank DVD, a computer with compatible Wi-Fi, and a few hours on your hands, you've got basically all you'll need. There are a number of ways you could set up Reaver, but here are the specific requirements for this guide:
  • How to Crack a Wi-Fi Network's WPA Password with ReaverThe BackTrack 5 Live DVD. BackTrack is a bootable Linux distribution that's filled to the brim with network testing tools, and while it's not strictly required to use Reaver, it's the easiest approach for most users. Download the Live DVD from BackTrack's download page and burn it to a DVD. You can alternately download a virtual machine image if you're using VMware, but if you don't know what VMware is, just stick with the Live DVD. As of this writing, that means you should select BackTrack 5 R1 from the Release drop-down, select Gnome, 32- or 64-bit depending on your CPU (if you don't know which you have, 32 is a safe bet), ISO for image, and then download the ISO.
  • A computer with Wi-Fi and a DVD drive.BackTrack will work with the wireless card on most laptops, so chances are your laptop will work fine. However, BackTrack doesn't have a full compatibility list, so no guarantees. You'll also need a DVD drive, since that's how you'll boot into BackTrack. I used a six-year-old MacBook Pro.
  • A nearby WPA-secured Wi-Fi network. Technically, it will need to be a network using WPA security with the WPS feature enabled. I'll explain in more detail in the "How Reaver Works" section how WPS creates the security hole that makes WPA cracking possible.
  • A little patience. This is a 4-step process, and while it's not terribly difficult to crack a WPA password with Reaver, it's a brute-force attack, which means your computer will be testing a number of different combinations of cracks on your router before it finds the right one. When I tested it, Reaver took roughly 2.5 hours to successfully crack my password. The Reaver home page suggests it can take anywhere from 4-10 hours. Your mileage may vary.

Let's Get Crackin'

At this point you should have BackTrack burned to a DVD, and you should have your laptop handy.

Step 1: Boot into BackTrack

How to Crack a Wi-Fi Network's WPA Password with ReaverTo boot into BackTrack, just put the DVD in your drive and boot your machine from the disc. (Google around if you don't know anything about live CDs/DVDs and need help with this part.) During the boot process, BackTrack will prompt you to to choose the boot mode. Select "BackTrack Text - Default Boot Text Mode" and press Enter.
Eventually BackTrack will boot to a command line prompt. When you've reached the prompt, type startx and press Enter. BackTrack will boot into its graphical interface.

Step 2: Install Reaver

Reaver has been added to the bleeding edge version of BackTrack, but it's not yet incorporated with the live DVD, so as of this writing, you need to install Reaver before proceeding. (Eventually, Reaver will simply be incorporated with BackTrack by default.) To install Reaver, you'll first need to connect to a Wi-Fi network that you have the password to.
  1. Click Applications > Internet > Wicd Network Manager
  2. Select your network and click Connect, enter your password if necessary, click OK, and then click Connect a second time.
Now that you're online, let's install Reaver. Click the Terminal button in the menu bar (or click Applications > Accessories > Terminal). At the prompt, type:
 apt-get update 
And then, after the update completes:
 apt-get install reaver 
How to Crack a Wi-Fi Network's WPA Password with ReaverIf all went well, Reaver should now be installed. It may seem a little lame that you need to connect to a network to do this, but it will remain installed until you reboot your computer. At this point, go ahead and disconnect from the network by opening Wicd Network Manager again and clicking Disconnect. (You may not strictly need to do this. I did just because it felt like I was somehow cheating if I were already connected to a network.)

Step 3: Gather Your Device Information, Prep Your Crackin'

In order to use Reaver, you need to get your wireless card's interface name, the BSSID of the router you're attempting to crack (the BSSID is a unique series of letters and numbers that identifies a router), and you need to make sure your wireless card is in monitor mode. So let's do all that.
Find your wireless card: Inside Terminal, type:
 iwconfig 
How to Crack a Wi-Fi Network's WPA Password with ReaverPress Enter. You should see a wireless device in the subsequent list. Most likely, it'll be named wlan0, but if you have more than one wireless card, or a more unusual networking setup, it may be named something different.
Put your wireless card into monitor mode: Assuming your wireless card's interface nameis wlan0, execute the following command to put your wireless card into monitor mode:
 airmon-ng start wlan0 
This command will output the name of monitor mode interface, which you'll also want to make note of. Most likely, it'll be mon0, like in the screenshot below. Make note of that.
Find the BSSID of the router you want to crack: Lastly, you need to get the unique identifier of the router you're attempting to crack so that you can point Reaver in the right direction. To do this, execute the following command:
 airodump-ng wlan0 
(Note: If airodump-ng wlan0 doesn't work for you, you may want to try the monitor interface instead—e.g., airodump-ng mon0.)
You'll see a list of the wireless networks in range—it'll look something like the screenshot below:
When you see the network you want, press Ctrl+C to stop the list from refreshing, then copy that network's BSSID (it's the series of letters, numbers, and colons on the far left). The network should have WPA or WPA2 listed under the ENC column. (If it's WEP, use our previous guide to cracking WEP passwords.)
Now, with the BSSID and monitor interface name in hand, you've got everything you need to start up Reaver.

Step 4: Crack a Network's WPA Password with Reaver

Now execute the following command in the Terminal, replacing bssid and moninterfacewith the BSSID and monitor interface and you copied down above:
 reaver -i moninterface -b bssid -vv 
For example, if your monitor interface was mon0 like mine, and your BSSID was8D:AE:9D:65:1F:B2 (a BSSID I just made up), your command would look like:
 reaver -i mon0 -b 8D:AE:9D:65:1F:B2 -vv 
Press Enter, sit back, and let Reaver work its disturbing magic. Reaver will now try a series of PINs on the router in a brute force attack, one after another. This will take a while. In my successful test, Reaver took 2 hours and 30 minutes to crack the network and deliver me with the correct password. As mentioned above, the Reaver documentation says it can take between 4 and 10 hours, so it could take more or less time than I experienced, depending. When Reaver's cracking has completed, it'll look like this:
A few important factors to consider: Reaver worked exactly as advertised in my test, but it won't necessarily work on all routers (see more below). Also, the router you're cracking needs to have a relatively strong signal, so if you're hardly in range of a router, you'll likely experience problems, and Reaver may not work. Throughout the process, Reaver would sometimes experience a timeout, sometimes get locked in a loop trying the same PIN repeatedly, and so on. I just let it keep on running, and kept it close to the router, and eventually it worked its way through.
Also of note, you can also pause your progress at any time by pressing Ctrl+C while Reaver is running. This will quit the process, but Reaver will save any progress so that next time you run the command, you can pick up where you left off-as long as you don't shut down your computer (which, if you're running off a live DVD, will reset everything).

How Reaver Works

Now that you've seen how to use Reaver, let's take a quick overview of how Reaver works. The tool takes advantage of a vulnerability in something called Wi-Fi Protected Setup, or WPS. It's a feature that exists on many routers, intended to provide an easy setup process, and it's tied to a PIN that's hard-coded into the device. Reaver exploits a flaw in these PINs; the result is that, with enough time, it can reveal your WPA or WPA2 password.
Read more details about the vulnerability at Sean Gallagher's excellent post on Ars Technica.

How to Protect Yourself Against Reaver Attacks

Since the vulnerability lies in the implementation of WPS, your network should be safe if you can simply turn off WPS (or, even better, if your router doesn't support it in the first place). Unfortunately, as Gallagher points out as Ars, even with WPS manually turned off through his router's settings, Reaver was still able to crack his password.
In a phone conversation, Craig Heffner said that the inability to shut this vulnerability down is widespread. He and others have found it to occur with every Linksys and Cisco Valet wireless access point they've tested. "On all of the Linksys routers, you cannot manually disable WPS," he said. While the Web interface has a radio button that allegedly turns off WPS configuration, "it's still on and still vulnerable.
So that's kind of a bummer. You may still want to try disabling WPS on your router if you can, and test it against Reaver to see if it helps.
You could also set up MAC address filtering on your router (which only allows specifically whitelisted devices to connect to your network), but a sufficiently savvy hacker could detect the MAC address of a whitelisted device and use MAC address spoofing to imitate that computer.
Further Reading
Thanks to this post on Mauris Tech Blog for a very straightforward starting point for using Reaver. If you're interested in reading more, see:
Reddit user jagermo (who I also spoke with briefly while researching Reaver) has created apublic spreadsheat intended to build a list of vulnerable devices so you can check to see if your router is susceptible to a Reaver crack.
Read more...
Author Unknown | 0 comments

How to Crack a Wi-Fi Network’s WEP Password with BackTrack

How to Crack a Wi-Fi Network's WEP Password with BackTrack
You already know that if you want to lock down your Wi-Fi network, you should opt for WPA encryption because WEP is easy to crack. But did you know how easy? Take a look.
Note: This post demonstrates how to crack WEP passwords, an older and less often used network security protocol. If the network you want to crack is using the more popular WPA encryption, see our guide to cracking a Wi-Fi network's WPA password with Reaver instead.
Today we're going to run down, step-by-step, how to crack a Wi-Fi network with WEP security turned on. But first, a word: Knowledge is power, but power doesn't mean you should be a jerk, or do anything illegal. Knowing how to pick a lock doesn't make you a thief. Consider this post educational, or a proof-of-concept intellectual exercise.
Dozens of tutorials on how to crack WEP are already all over the internet using this method. Seriously—Google it. This ain't what you'd call "news." But what is surprising is that someone like me, with minimal networking experience, can get this done with free software and a cheap Wi-Fi adapter. Here's how it goes.

What You'll Need

How to Crack a Wi-Fi Network's WEP Password with BackTrackUnless you're a computer security and networking ninja, chances are you don't have all the tools on hand to get this job done. Here's what you'll need:
  • A compatible wireless adapter—This is the biggest requirement. You'll need a wireless adapter that's capable of packet injection, and chances are the one in your computer is not. After consulting with my friendly neighborhood security expert, I purchased an Alfa AWUS050NH USB adapter, pictured here, and it set me back about $50 on Amazon. Update: Don't do what I did. Get the Alfa AWUS036H, not the US050NH, instead. The guy in this video below is using a $12 model he bought on Ebay (and is even selling his router of choice). There are plenty of resources on getting aircrack-compatible adapters out there.
  • A BackTrack Live CD. We already took you on a full screenshot tour of how to install and use BackTrack 3, the Linux Live CD that lets you do all sorts of security testing and tasks. Download yourself a copy of the CD and burn it, or load it up in VMware to get started.
  • A nearby WEP-enabled Wi-Fi network. The signal should be strong and ideally people are using it, connecting and disconnecting their devices from it. The more use it gets while you collect the data you need to run your crack, the better your chances of success.
  • Patience with the command line. This is an ten-step process that requires typing in long, arcane commands and waiting around for your Wi-Fi card to collect data in order to crack the password. Like the doctor said to the short person, be a little patient.

Crack That WEP

To crack WEP, you'll need to launch Konsole, BackTrack's built-in command line. It's right there on the taskbar in the lower left corner, second button to the right. Now, the commands.
First run the following to get a list of your network interfaces:
airmon-ng
The only one I've got there is labeled ra0. Yours may be different; take note of the label and write it down. From here on in, substitute it in everywhere a command includes (interface).
Now, run the following four commands. See the output that I got for them in the screenshot below.

airmon-ng stop (interface)
ifconfig (interface) down
macchanger --mac 00:11:22:33:44:55 (interface)
airmon-ng start (interface)
How to Crack a Wi-Fi Network's WEP Password with BackTrackIf you don't get the same results from these commands as pictured here, most likely your network adapter won't work with this particular crack. If you do, you've successfully "faked" a new MAC address on your network interface, 00:11:22:33:44:55.
Now it's time to pick your network. Run:
airodump-ng (interface)
To see a list of wireless networks around you. When you see the one you want, hit Ctrl+C to stop the list. Highlight the row pertaining to the network of interest, and take note of two things: its BSSID and its channel (in the column labeled CH), as pictured below. Obviously the network you want to crack should have WEP encryption (in the ENC) column, not WPA or anything else.
How to Crack a Wi-Fi Network's WEP Password with BackTrackLike I said, hit Ctrl+C to stop this listing. (I had to do this once or twice to find the network I was looking for.) Once you've got it, highlight the BSSID and copy it to your clipboard for reuse in the upcoming commands.
Now we're going to watch what's going on with that network you chose and capture that information to a file. Run:
airodump-ng -c (channel) -w (file name) --bssid (bssid) (interface)
Where (channel) is your network's channel, and (bssid) is the BSSID you just copied to clipboard. You can use the Shift+Insert key combination to paste it into the command. Enter anything descriptive for (file name). I chose "yoyo," which is the network's name I'm cracking.
How to Crack a Wi-Fi Network's WEP Password with BackTrack
You'll get output like what's in the window in the background pictured below. Leave that one be. Open a new Konsole window in the foreground, and enter this command:
aireplay-ng -1 0 -a (bssid) -h 00:11:22:33:44:55 -e (essid) (interface)
Here the ESSID is the access point's SSID name, which in my case is yoyo. What you want to get after this command is the reassuring "Association successful" message with that smiley face.
How to Crack a Wi-Fi Network's WEP Password with BackTrack
You're almost there. Now it's time for:
aireplay-ng -3 -b (bssid) -h 00:11:22:33:44:55 (interface)
Here we're creating router traffic to capture more throughput faster to speed up our crack. After a few minutes, that front window will start going crazy with read/write packets. (Also, I was unable to surf the web with the yoyo network on a separate computer while this was going on.) Here's the part where you might have to grab yourself a cup of coffee or take a walk. Basically you want to wait until enough data has been collected to run your crack. Watch the number in the "#Data" column—you want it to go above 10,000. (Pictured below it's only at 854.)
Depending on the power of your network (mine is inexplicably low at -32 in that screenshot, even though the yoyo AP was in the same room as my adapter), this process could take some time. Wait until that #Data goes over 10k, though—because the crack won't work if it doesn't. In fact, you may need more than 10k, though that seems to be a working threshold for many.
How to Crack a Wi-Fi Network's WEP Password with BackTrack
Once you've collected enough data, it's the moment of truth. Launch a third Konsole window and run the following to crack that data you've collected:
aircrack-ng -b (bssid) (file name-01.cap)
Here the filename should be whatever you entered above for (file name). You can browse to your Home directory to see it; it's the one with .cap as the extension.
If you didn't get enough data, aircrack will fail and tell you to try again with more. If it succeeds, it will look like this:
The WEP key appears next to "KEY FOUND." Drop the colons and enter it to log onto the network.


Problems Along the Way

With this article I set out to prove that cracking WEP is a relatively "easy" process for someone determined and willing to get the hardware and software going. I still think that's true, but unlike the guy in the video below, I had several difficulties along the way. In fact, you'll notice that the last screenshot up there doesn't look like the others—it's because it's not mine. Even though the AP which I was cracking was my own and in the same room as my Alfa, the power reading on the signal was always around -30, and so the data collection was very slow, and BackTrack would consistently crash before it was complete. After about half a dozen attempts (and trying BackTrack on both my Mac and PC, as a live CD and a virtual machine), I still haven't captured enough data for aircrack to decrypt the key.
So while this process is easy in theory, your mileage may vary depending on your hardware, proximity to the AP point, and the way the planets are aligned. Oh yeah, and if you're on deadline—Murphy's Law almost guarantees it won't work if you're on deadline.

To see the video version of these exact instructions, check out this dude's YouTube video.


Got any experience with the WEP cracking courtesy of BackTrack? What do you have to say about it? Give it up in the comments.
Read more...
Related Posts Plugin for WordPress, Blogger...